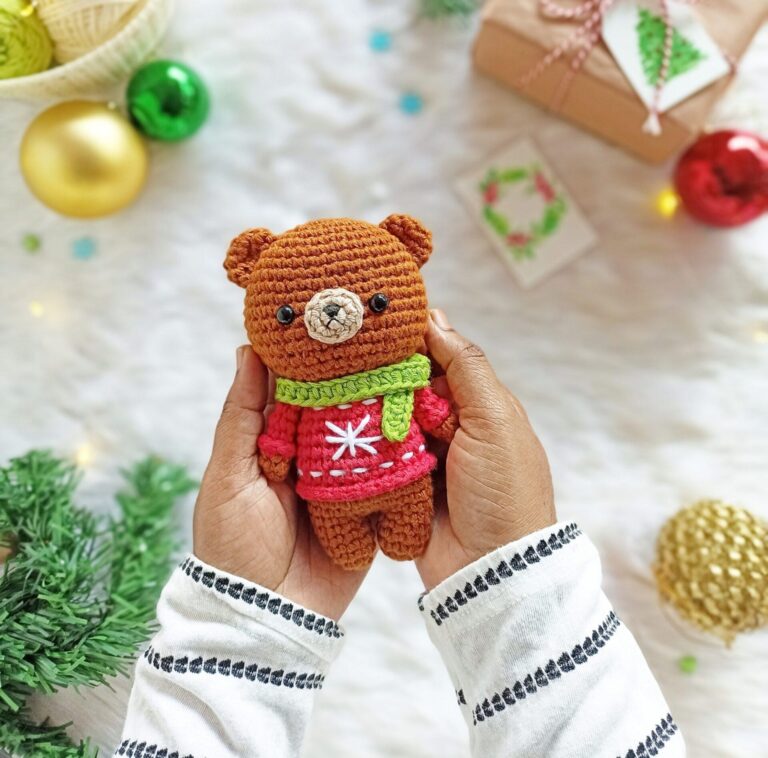
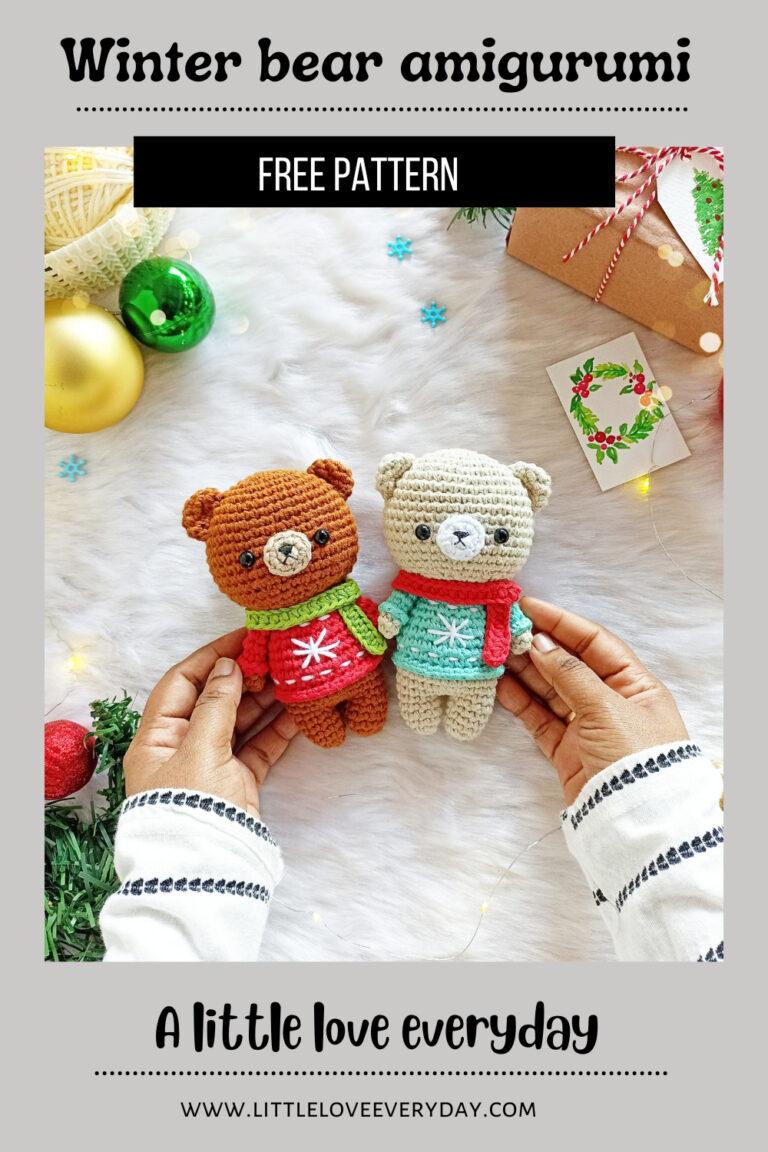
• Home
  • Shop
  • Free patterns
  • About
  • Contact
  • Privacy Policy
    • Terms of Use

A little love everyday

Adventures in amigurumi, crochet and more

Amigurumi, Animal patterns, Christmas patterns, Free patterns

Winter bear amigurumi

December 1, 2023

Winter bear amigurumi pattern

December is my favorite time of the year! I’m sure many have started decorating for Christmas. In this post, I am sharing a cute winter bear amigurumi pattern with you all. They make a lovely Christmas ornament and stocking stuffers. Read below for instructions.

Please note: This pattern is for personal use only. Please don’t copy, reproduce, alter, distribute or sell this pattern in whole or in parts. You may sell the finished products but please credit me as the designer and link back to this post.

You can buy the ad free printable PDF pattern with detailed instructions and step by step pictures from my Etsy  and Ravelry shop.

Buy the pattern on Etsy
Buy the pattern on Ravelry


Instructions:

Winter bear amigurumi pattern is written in US English terms and worked in continuous rounds unless stated otherwise.

Materials needed:

  • DK weight cotton yarn in brown, red, cream, white and green colour.
  • 3 mm crochet hook.
  • Fiberfill for stuffing.
  • 8mm safety eyes.
  • Black embroidery thread and needle.
  • Yarn needle, stitch markers and scissors.

 Stitches/ Abbreviations

  • R – round/ row.
  • Ch – chain.
  • St(s) – stitch(es).
  • Sc – single crochet.
  • Hdc – half double crochet.
  • Inc – increase (2sc in one st).
  • Dec – decrease (sc 2 st together).
  • BLO – back loops only.
  • FLO – front loops only.
  • Sl st – slip stitch.
  • […] – repeat the instructions given in between the bracket.
  • (…) – total number of stitches.


Head:

Using brown yarn,

R1: 6 sc in a magic ring (6).                            

R2: Inc x 6 (12).

R3: [ Sc, inc ] x 6 (18).

R4: [ Sc 2, inc ] x 6 (24).

R5: [ Sc 3, inc ] x 6 (30).

R6: [ Sc 4, inc ] x 6 (36).

R7: [ Sc 5, inc ] x 6 (42).

R8-15: Sc in each st (42) – 8 rounds.

R16: [ Sc 5, dec ] x 6 (36).

R17: [ Sc 4, dec ] x 6 (30).

Insert 8 mm safety eyes between R12 and R13 with 7 stitches in between.

R18: [ Sc 3, dec ] x 6 (24).

R19: [ Sc 2, dec ] x 6 (18).

Stuff firmly and fasten off leaving a long tail for sewing.

Arms (make 2):

Start with brown yarn,

R1: 6 sc in magic ring (6).

R2: [ Sc 2, inc ] x 2 (8).

Switch to red colour yarn

R3: Sc in each st (8).

R4: (work in BLO) Sc in each st (8).

R5-7: Sc in each st (8).

Stuff a little and sc through both the top layers to close.

Fasten off leaving a long tail for sewing.

Join red yarn to the front loop of R3, ch 1 and

Sc in each st (8).

Sl st to the first sc, fasten off and weave in the ends.

Legs (make 2):

Using brown yarn,

R1: 6 sc in magic ring (6).

R2: [ Inc 2, sc ] x 2 (10).

R3-5: Sc in each st (10).

Fasten off the first leg but don’t cut off the yarn in second one. Stuff the legs and continue to body part.

Body:

R6: With the second leg, chain 2, join to the first leg and sc around the first leg (10 sts), sc in the 2 chains (2 sts), sc around the second leg (10 sts) and sc in the other side of 2 chains      (2 sts). [ 24 sts in total].   

R7: [ Sc 10, inc 2 ] x 2 (28).

R8-9: Sc in each st (28).

Switch to red colour yarn,

R10: Sc in each st (28).

R11: (work in BLO) Sc in each st (28).

R12-13: Sc in each st (28).

R14: [ Sc 5, dec ] x 4 (24).

R15: Sc in each st (24).

R16: [ Sc 4, dec ] x 4 (20).

R17: Sc in each st (20).

R18: [ Sc 8, dec ] x 2 (18).

Stuff the body, fasten off and weave in the ends.

Join red yarn to the front loop of R11, ch 1 and

Sc in each st (28).

Sl st to the first sc, fasten off and weave in the ends.

Ear:

Using brown yarn,

R1: 6 sc in a magic ring (6).                            

R2: Inc x 6 (12).

R3: [ Sc 3, inc ] x 3 (15).

Fasten off leaving a long tail for sewing.

Muzzle:

Using cream yarn,

R1: 6 sc in a magic ring (6).                            

R2: Inc x 6 (12).

Fasten off leaving a long tail for sewing.

Embroider the nose using 2 or 3 strands of black embroidery thread.

Scarf:

Using green yarn, Ch 52.

Starting from third chain on hook, hdc 50 (50).

Fasten off and weave in the ends. 

Assembling:

  • Sew the muzzle in between the eyes.
  • Sew the ears between R6 – R9.
  • Attach the head to the body.
  • Sew the arms where the head meets the body.
  • Using white yarn, embroider a snowflake three rows down from the head.
  • Make a running stitch one row above and below the snowflake.

Finally wrap the scarf around the neck and your bear is now ready!

I really hope you enjoyed making this pattern. I’d love to see your works! Kindly share your makes and tag me on Instagram @littleloveeveryday

Click below to save this pattern on Pinterest

Winter bear amigurumi pin

Looking for more christmas makes, check out these patterns below.

Amigurumi Snowman
Christmas wreath
Christmas Wreath
Crochet snow globe ornament
Crochet snow globe
Crochet snow man ornament
Snow man ornament

Previous:
Amigurumi Ghost pattern
Next:
Valentine cookies amigurumi

You might also enjoy

Amigurumi elephant patternAmigurumi Elephant pattern
Amigurumi SnowmanAmigurumi Snowman Pattern
Amigurumi TigerAmigurumi Tiger pattern

Categories

  • Amigurumi
  • Animal patterns
  • Christmas patterns
  • Fall patterns
  • Free patterns
  • Spring patterns
  • Tutorials

Search

Recent Posts

  • Amigurumi Bunny Keychain
  • Amigurumi Axolotl
  • Amigurumi Latte pattern
  • Amigurumi Yeti pattern
  • Crochet Sunflower coaster

Pages

  • About
  • Contact
  • Free Cat patterns
  • Free Christmas patterns
  • Free Fall patterns
  • Free patterns
  • Free Valentines Day patterns
  • Home
  • Join the family!
  • Links
  • Privacy Policy
  • Terms of Use
Design by SkyandStars.co

Copyright © 2025 · littleloveeveryday