
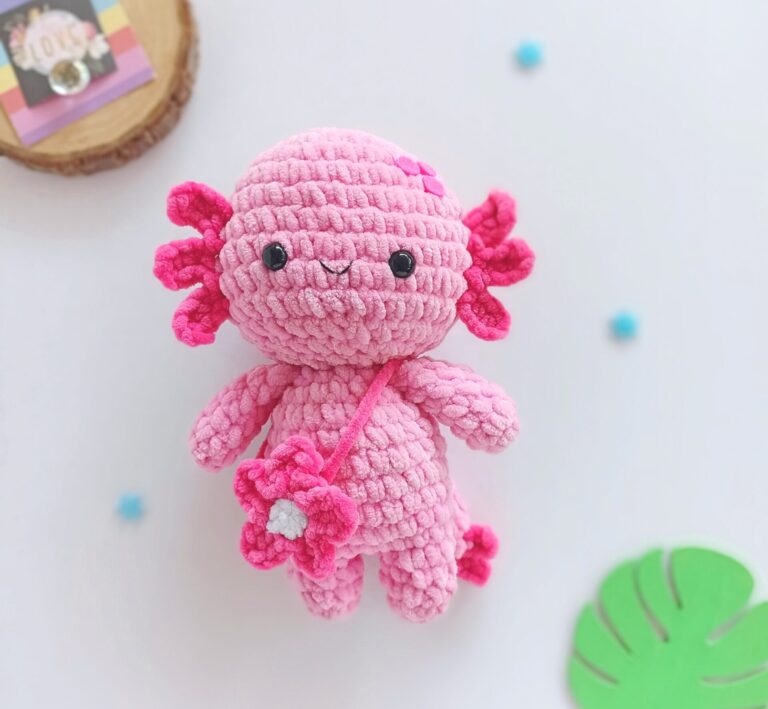
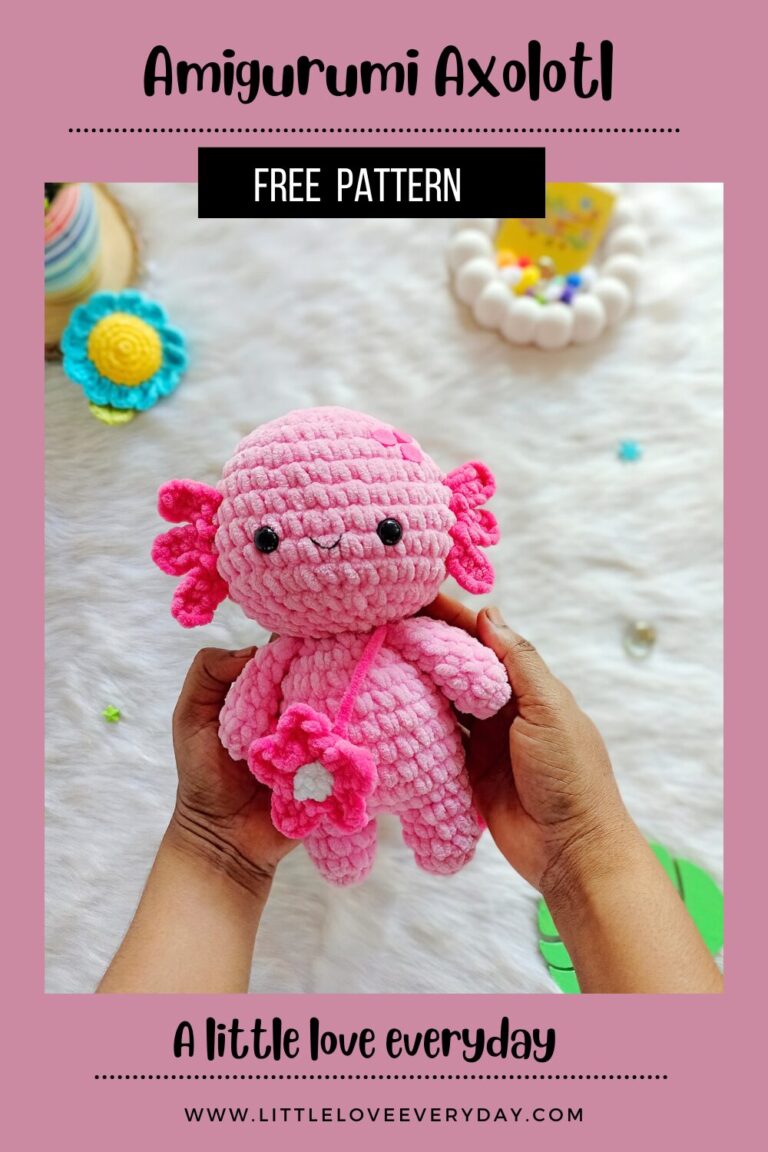
Spring is here! Instead of bunnies, bees, and flowers, I have decided to make an axolotl with a flower bag this time. So, let’s welcome this spring by making this cute amigurumi axolotl.
Read below for pattern instructions.
Please note:
This amigurumi Axolotl pattern is for personal use only. Please don’t copy, reproduce, alter, distribute or sell this pattern in whole or in parts. You may sell the finished products but kindly credit me as the designer and link back to this post.
You can buy the inexpensive ad free printable PDF pattern with detailed instructions and step by step pictures from my Etsy shop.
Instructions:
Amigurumi Axolotl pattern is written in US English terms and worked in continuous rounds unless stated otherwise.
Materials needed:
- Bulky weight chenille yarn in pink, dark pink and white (I have used Nako BonBon Panda baby yarn).
- 4.5 mm crochet hook.
- Fiberfill for stuffing.
- 12 mm safety eyes.
- Black embroidery thread and needle.
- Yarn needle, stitch markers and scissors.
- Optional: a small amount of felt in pink and fabric glue
Stitches/Abbreviations
- R – round/row.
- Ch – chain.
- St(s) – stitch(es).
- Sc – single crochet.
- Hdc – half double crochet.
- Dc – double crochet.
- Inc – increase (2 sc in one st).
- Dec – decrease (sc 2 st together).
- Sl st – slip stitch.
- […] – repeat the instructions given in between the brackets.
- (…) – total number of stitches.
Pattern Instructions:
Head:
Using pink yarn,
R1: Ch 2, 7 sc in second chain from hook (7).
R2: Inc x 7 (14).
R3: [ Sc, inc ] x 7 (21).
R4: [ Sc 2, inc ] x 7 (28).
R5: [ Sc 3, inc ] x 7 (35).
R6-11: Sc in each st (35) – 6 rounds.
R12: [ Sc 3, dec ] x 7 (28).
R13: [ Sc 2, dec ] x 7 (21).
Insert 12 mm safety eyes between R9 and R10 with 6 stitches in between.
R14: [ Sc, dec ] x 7 (14).
Stuff firmly and fasten off leaving a long tail for sewing.
Arms (make 2):
Using pink yarn,
R1: Ch 2, 6 sc in second chain from hook (6).
R2: [ Sc 2, inc ] x 2 (8).
R3-7: Sc in each st (8) – 5 rounds.
Stuff lightly and sc 4 through both the top layers to close.
Fasten off leaving a long tail for sewing.
Legs (make 2):
Using pink yarn,
R1: Ch 2, 6 sc in second chain from hook (6).
R2: [ Sc, inc 2 ] x 2 (10).
R3-4: Sc in each st (10) – 2 rounds.
Fasten off the first leg but don’t cut off the yarn for the second one. Stuff the legs and continue to body section.
Body:
R5: With the second leg, chain 2, join to the first leg and sc around the first leg (10 sts), sc in the 2 chains (2 sts), sc around the second leg (10 sts) and sc in the other side of the 2 chains (2 sts). You should have 24 sts in total.
R6: [ Sc 11, inc ] x 2 (26).
R7-10: Sc in each st (26) – 4 rounds.
R11: [ Sc 5, dec, sc 4, dec ] x 2 (22).
R12: Sc in each st (22).
R13: [ Sc 4, dec, sc 3, dec ] x 2 (18).
R14: [ Sc 3, dec, sc 2, dec ] x 2 (14).
Stuff the body, fasten off and weave in the ends.
Tail:
Using pink yarn,
R1: Ch 2, 6 sc in second chain from hook (6).
R2: [ Sc, inc ] x 3 (9).
R3: [ Sc 2, inc ] x 3 (12).
R4-5: Sc in each st (12) – 2 rounds.
R6: [ Sc 2, dec ] x 3 (9).
Don’t stuff and sc through both the top layers to close.
Fasten off leaving a long tail for sewing.
Flatten the tail and attach dark pink yarn between R1 and R2 on the right side of the tail.
[ Ch 3, sl st in 2nd chain from the hook, sc in next nd and sl st to the top part of the tail ] x 2
Again ch 3, sl st on second chain from the hook, sc in next st but sl st to the space between R1 and R2 to the left side of the tail this time.
Fasten off and weave in the ends.

Gills:
Using dark pink yarn,
Left gills:
Insert hook into a st between R10 and R11 of the head, 4 stitches away from the eyes (to your right) and pull the new yarn through. Continue with step 1.
- Ch 5, starting in third chain from the hook, hdc, sc 2 and sl st into the adjacent st above (between R9 and R10).
- Ch 5, starting in third chain from the hook, hdc, sc 2 and sl st into the adjacent st above (between R8 and R9).
- Ch 5, starting in third chain from the hook, hdc, sc 2 and sl st into the adjacent st above (between R7 and R8).
Fasten off and weave in the ends.
Right gills:
Insert hook into a stitch between R7 and R8 of the head, 4 stitches away from the eyes (to your left) and pull the new yarn through. Continue to step 1.
- Ch 5, starting in third chain from the hook, hdc, sc 2 and sl st into the adjacent st below (between R8 and R9).
- Ch 5, starting in third chain from the hook, hdc, sc 2 and sl st into the adjacent st below (between R9 and R10).
- Ch 5, starting in third chain from the hook, hdc, sc 2 and sl st into the adjacent st below (between R10 and R11). Fasten off and weave in the ends.

Assembling:
- Embroider a small curve using black embroidery thread for the mouth.
- Attach the head to the body.
- Sew the arms where the head meets the body.
- Attach the tail diagonally between R8 and R9 of the body.
Flower bag:
Using white yarn,
Ch 2, 5 sc in second chain from hook (5).
Sl st to the first st and fasten off.
Insert dark pink yarn into one of the stitches above and
[ (Ch 2, dc, ch 2, sl st) in same st, sl st in next st ] x 5.
Fasten off leaving a long enough tail to make the bag strap.
Wrap the long tail around the axolotl and sew the tail end to the other side of the flower to form a strap for the bag. Weave in ends.
Cut three small circles in dark pink felt and glue it to one side of the head (optional).
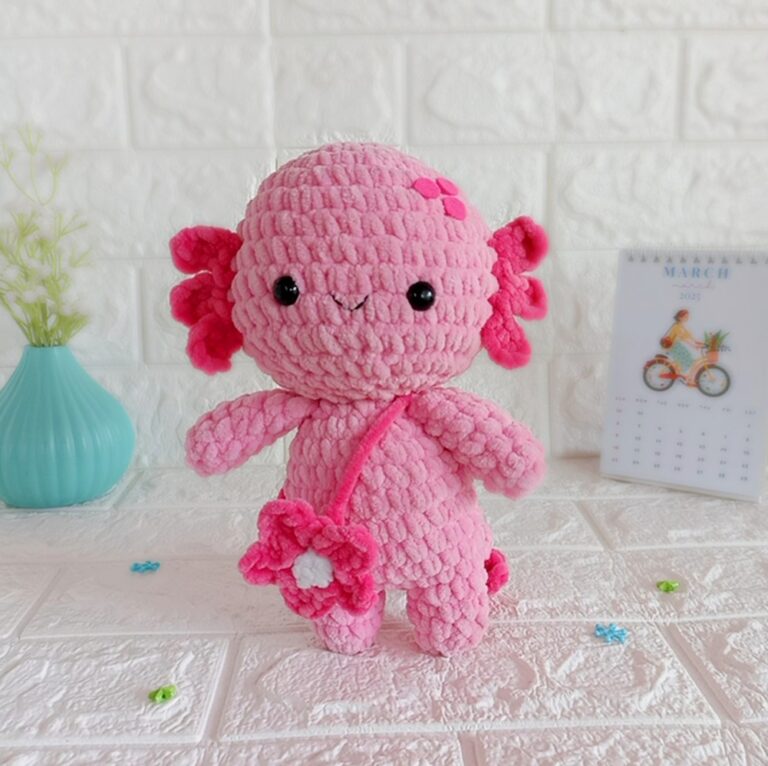
Your cute little Axolotl is now ready!
CLICK BELOW IMAGE TO SAVE THIS PATTERN ON PINTEREST
Looking for more spring patterns, check below free patterns.